How to Add a Mirror Ball Nadir in GoThru

Adding a mirror ball nadir is a great way to cover the tripod area in your 360 panoramas, giving your virtual tour a cleaner and more professional appearance. Follow the steps below to add it using GoThru’s new interface.
Step-by-Step Guide
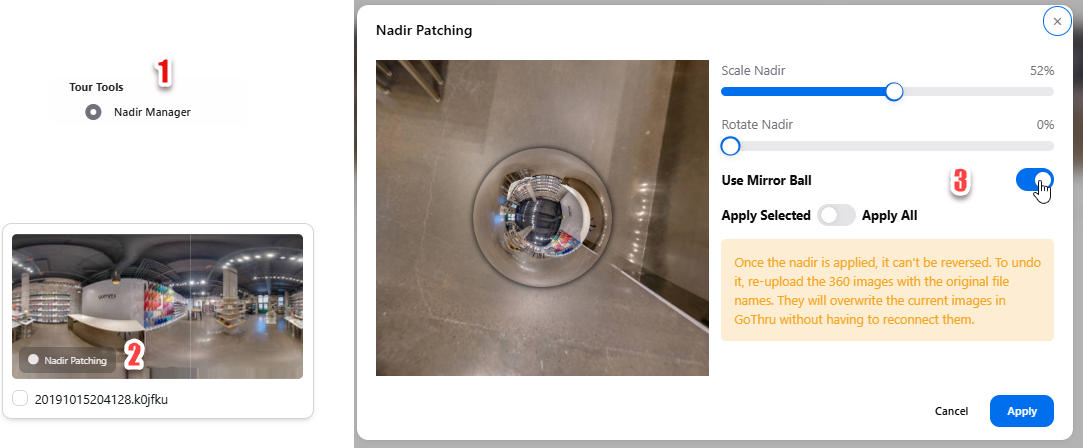
1. Open Nadir Manager
- From the My Tours page, locate the tour you want to edit.
- Click the Tools button and select Nadir Manager from the list.
2. Select Your Panorama
- A thumbnail preview of your tour’s panoramas will appear.
- Select the panorama(s) where you want to apply the mirror ball nadir.
3. Enable Mirror Ball
- In the Nadir Patching panel, toggle the switch labeled “Use Mirror Ball” to activate the effect.
- You will immediately see a circular mirror effect applied over the nadir (bottom) area of the panorama.
4. Adjust the Settings
- Scale Nadir: Drag the slider to adjust the size of the mirror ball.
- Rotate Nadir: Adjust the rotation of the nadir if necessary.
- You can preview the changes in real-time within the viewer.
5. Apply to Panoramas
- Toggle Apply Selected if you want to patch only selected images.
- Or toggle Apply All to apply the mirror ball nadir to all images in the tour.
6. Apply Changes
- Click the Apply button.
- Important: Once applied, the nadir cannot be undone. To revert, you must re-upload the original 360 images (with the exact file names), and GoThru will automatically replace and reconnect them without losing links.
That’s it! You’ve successfully added a mirror ball nadir to your panorama using GoThru.
Let me know if you’d like this tutorial added to the canvas or exported in a document format.