How to Create a Hosted Tour
The most important type of toru on GoThru is the Hosted Tour which is available for any listing on GoThru and the images are served by GoThru servers. Similar to the Google Business tour type, you can also modify the panoramas or patch the nadir but you do not publish a hosted tour on Google.
The Hosted Tour uses options which can be set in the same way as the Google Business tour, and these are the steps how to work with the Hosted Tour.
Step 1: Get started
1. Click on the Constellation tab on the top bar.

2. Click +Create New Tour.

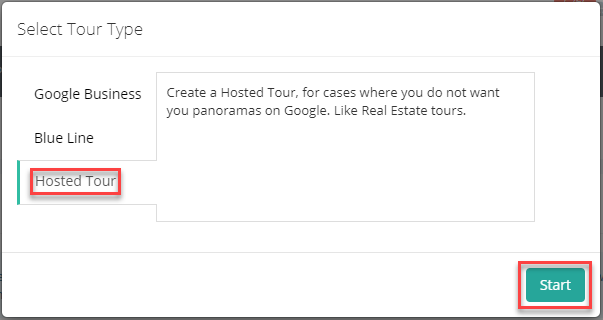
3. Select the tour type, Hosted tour and click start.

4. Please type below the Tour Name and then click on the "Create New Tour" button.

Step 2: Upload panorama
1. Click Upload panorama

2. Use the Drop Zone to upload your Pre-Stitched Panoramas or use the Import from Google Drive button to import panoramas from your Google Drive account.

3. In this second case press Import from Google Drive button, Search for your panoramas on Google Drive by typing the business name. Once found, press the Start Import button, then Done.

4. Wait until the upload is finished. Once the upload or importing finished, go to Constellations -> Tools you will be able to see the panoramas count and panoramas dot representation on the map for the current tour

Step 3: The moderation process
At this point, you are able to initiate the moderation process. Press Create Navigation to open the GoThru Moderator tool.

The Moderator tool has the following structure:

- Unlinked panoramas - On the lower right corner you can find the list of unlinked panoramas. Once connected, they will move to the list from the lower left corner.
- Preview Window - On the top right corner there is the Preview window.
- Map - On the upper left corner there’s a map containing the numbered panoramas displayed as red dots.
- Preview of the cover - The center of the Moderator is occupied by a preview of the cover for the selected panorama.
- Active Panoramas - On the lower side there are the thumbnails for the active panoramas in the Moderator.
- Connected Panoramas - On the lower bottom left you can see the panoramas that have been connected.
The moderation process implies the following steps:
1. Double click on the first panorama.
2. Position the centerline (in red) where the next panorama is. Under the Preview image, there are the thumbnails for the active panoramas in the Moderator.

3. Double click on the next panorama. Center the preview image to be aligned like in the image below, with the red line through the middle of the image.

4. At this point, if you look on the map, you will notice that GoThru has already created the link between the first and the second panorama. On the cover image, you can see that GoThru automatically created the nadir patching for your panoramas.

Notes:
- Pressing the Up and Down arrows on the image will alternate back and forth views of the image. This feature helps you make sure you have a good connection between the panoramas.
- Using the mouse scroll will zoom in/out the panorama. This will also impact the map, changing the distance between panoramas.
5. Now you should solidify the newly created link by pressing the blue arrow like in the image below. On the cover image, press the F key (F=flip) to visually verify if your link is correct.

6. Now click the new link on the map to close the connection. The moderation process continues with finding the next panorama in the unlinked panoramas list.
7. If necessary, you can reposition the constellation on the map. You can select it and drag it around or rotate it according to your needs.

8. If you like, you can create a preview for the constellation (the speed and the image quality are not high, as this is not a tour yet). Inspecting the preview can be a useful tool, as it helps you verify if the constellation is correct (it is easier to correct a constellation than change a tour).

9. Repeat the steps described above for all the panoramas you want to link. Once you have finished linking all the panoramas, press Save at the top left corner. The moderation process is now complete.

Tips:
- You can adjust the transparency level of the upper-level panorama by pressing the keys from 1 to 9 from your keyboard while positioned on the image.
- GoThru offers a very useful feature called the A-Key. In case the panorama is not pointing in the right direction, instead of rotating the panorama on the map to obtain a proper angle, set the red line where the link should point and press A. This will automatically correct the angle and correctly align the panoramas.
Step 4: Get the tour link
1. Go back to the Tools screen. Constellation manager -> Tools.

2. In the Tools screen, click on the Overlay to open GoThru Overlay Editor.
The Overlay editor allows you to set up responsive plugins such as menu, hotspot, maps, control bar and so on. You can refer to Overlay Editor User Interface to learn more about Overlay editor.

3. To get the tour link, you can click on the publish button on the top-right corner. The Publish button will open the Overlay Manager where you can get the hosted tour link and embed code, edit tour overlay, create new overlay, see tour stats, clone the tour and delete tour.

4. You notice the tour link like in the example below https://tourmkr.com/F1wpUic6s2. You can use the Tourmkr link to share the tour to anyone you like, your client, friends or for other business purposes without publishing it to Google.

5. You can also generate the tour embed code by activating the tour first. Activate -> Embed.
Visit How To Embed An Overlay Virtual Tour to learn how to embed a tour to your website.
