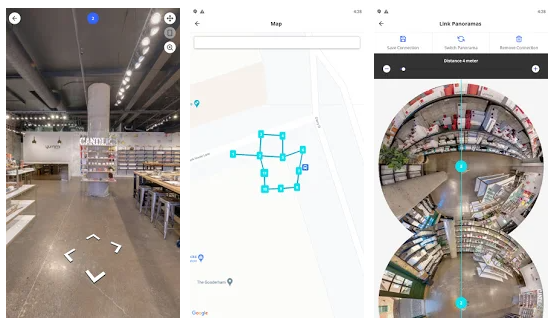
How to use GoThru Street Editor to publish panoramas to Google Street View

GoThru Street Editor is an app that allows you to create your own virtual tour using your mobile phone. This app is designed to connect your 360 panoramic images for the purpose of publishing the panoramas to Google Street View. You can publish your first virtual tour, completely easy and interactive with your smartphone, and you can also edit and moderate the panoramas, adding the arrows and publishing directly to Google Street View.
Before you start
- You should create an account in GoThru Street Editor. Download the GoThru Street Editor or visit GoThru web page ( https://GoThru.co ) and sign up with your email address or Google account for free.
- You can use 360 panoramas images from your phone gallery or from your existing GoThru listings on https://GoThru.co .
- Make sure your panoramas are minimum 5300px width x 2650px height and maximum 14000px width x 7000px height.
- GoThru Street Editor supports Hosted Virtual Tour served by GoThru servers and Google Business View served by Google servers.
Here are some simple steps on how to use GoThru Street Editor to publish panoramas to Google Street View
Step 1: Sign in and get started
- Sign in to GoThru Street Editor. You will be taken to the GoThru Street Editor homepage.
- Click Create Google Business View or Create Hosted Virtual Tour.
- Find your location and enter the tour name.
- Click Save.
Step 2: Upload panoramas
There are two options available. You can choose either importing 360 panoramas images from your phone gallery or from existing GoThru account
Import 360 panoramas images from your phone gallery
- Click Add Panorama.
- Allow access to your device data.
- Select panoramas from your local data then upload.
- Wait until the upload is finished.
Import 360 panoramas images from your GoThru account
- Go to the Street Editor main menu on left side.
- Click on the GoThru Listings.
- Press the sync button to synchronize the account.
- Wait until the process is finished.
- You will notice all GoThru Listings imported to your Street Editor App.
- Now you can select a tour and continue to moderation process.
Step 3: The Moderation Process
The Moderation page has the following buttons:
- Panorama Number - It represents the number of the panorama to help you in the moderation process.
- View Panorama - It is used to preview the panorama and its connection to others panoramas in a fullscreen.
- Add Connection - It redirects you to Panorama Moderating Screen used to create connection between panoramas.
- Delete Panorama - The Delete button on the bottom-left corner can be used to delete the selected panorama.
- Show Panorama - This button allows you to show the uploaded panoramas on the moderation screen.
- Hide Panorama - This button allows you to hide the uploaded panoramas on the moderation screen.
The moderation process implies the following steps:
- Locate to the first panorama and click on the Add Connection button.
- Connect the first panorama to the next panorama.
- Center the images to be aligned with the blue line through the middle of the image.
- If necessary, adjust the distance of the panoramas using the distance slider.
- Save the connection.
- Repeat the steps described above for all the panoramas you want to link.
Step 4: Upload Tour
Finally upload the constellation to your GoThru account, and publish it to Google Street View. If necessary, you can preview the constellation to verify if the panorama connections are correct.
That's it! Your fancy and interactive virtual tour is now ready to be shared with friends or clients.
Download the app to publish unlimited tours.

